Thursday, January 26, 2012

And the winner is...

Are we to paint what's on the face, what's inside the face or what's behind it?                                                
                                                       --Pablo Picasso


Dora Maar      Picasso 1937


annemadethis giveaway winner!

And the winner is...    Kim for her comments on December 29th about my circular pendant:


Congratulations Kim! Please contact me at annemadethis@gmail.com for
mailing instructions for your bracelet.  Thank you for participating.

Stay tuned for another annemadethis giveaway!


anne


Tuesday, January 24, 2012

Perspective

There are always flowers for those who want to see them.
                                                                               Henri Matisse

Every one looks at things differently.  So, what I see in the flowers can be different from what you see and that's OK.  Apply that idea to a chair.  A chair that seems reddish blue to me, may look bright red to you.  Matisse says he sees the chair the way it makes him feel. We are all coming from different places and see things from different perspectives.

The Racaille Chair   Henri Matisse 1946
Look how differently Van Gogh and Picasso "saw" a chair.

Nude in a Rocking Chair Picasso 1956
Paul Gauguin's Chair  Van Gogh  1888


If we all made allowances for how others "saw" things and respected them for it in our everyday life, not just in art and music; wouldn't this world be different? No religious wars necessary, no civil rights legislation necessary, Just peaceful coexistence with people who see things differently than we do.  WOW!

This week I have posted a couple of new bracelets on my Etsy site, they are pictured below.  You can see close up photos and read more about them at annemadethis .  The last one I made was snatched up in less than 24 hours from posting!

Black and Red Eiffel Tower Bracelet
Sunshine and Blue Skies Bracelet    


I hope you like the bracelets, I would welcome your feedback.


And just a reminder.  Don"t forget today is last day for the annemadethis free giveaway!  See my blog on 12/27/2011 or 1/17/2012.


anne

Tuesday, January 17, 2012

annemadethis Giveaway!!

"Color is my day long obsession, joy and torment"
                                                  --Claude Monet

Free annemadethis Giveaway

Enter now for your chance to win


Visit my Etsy shop and pick your favorite item .  Leave a comment on this blog post and tell me why you like the item.  This will automatically enter you for a free paper bead bracelet.  I will give away one of these annemadethis paper bead bracelets to one of you.  

Paper Bead Bracelet  Pastel
PASTEL PAPER BEAD BRACELET


Paper Bead Bracelet  Purple
PURPLE PAPER BEAD BRACELET

Every comment is a chance to win.  I will announce the winner on January 25th.  And in the meantime I will be looking forward to seeing what you have to say about my paper pendants on my previous post.

anne

Saturday, January 14, 2012

Recycled Paper Pendants


Everything begins with an idea
                              --E. Nightingale

Hi to all,

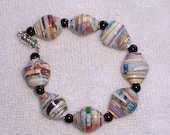
The other day someone asked me about making my recycled collage paper pendants.  You can get a look at them on my Etsy site; there are a few designs there and this link will take you to one of them.  Below is a picture of some of my recycled pendants.

Recycled Paper Pendants by annemadethis
So Pam, here is my "how-to" on making the pendants.  These are the supplies & tools you will need:

small piece of corrugated cardboard (at least 3"X 3")
2- eye pins not more than 1" (I prefer to use silver plated findings, they always look nice and shiny)*
1-1.5-2" head pin*
1-5mm-6mm jump ring*
1-bail*
a few small beads
magazine scraps
Tacky glue
Triple thick(R) gloss glaze
2 toothpicks
styrofoam egg carton
paper plate

Optional:  stamps, paint
Tools: scissors, jewelry pliers and wire cutters, 1/4" soft and 1/4" stiff brush, hot glue gun

These are some of the tools and supplies you will need.  This photo may help you locate them in your craft store.


1. Take corrugated cardboard and measure into 2- 1' X 1 1/2" rectangles.  (see below).  Cut the two small rectangles out.


2. Take one rectangle, line up the 2 eye pins in the center of the rectangle as shown below.


3. Now using a hot glue gun, set the two pins in position.


4. Using the hot glue gun again, glue the two rectangles together (like a sandwich), with the eye pins on the inside.  Make sure both eye pins stick out and the rectangles are lined up evenly. 


5. Now the fun part begins!  Cut your magazine scraps into strips about 1/4" and about 3 1/2" long.  Squeeze some tacky glue in a paper plate.  Using the tacky glue, glue one strip around the rectangle in one direction and then take another strip and wrap it around the other way.

6. Continue this process until you cover the entire piece of corrugated cardboard, all sides and front and back.


7. Now you can decorate your pendant with tiny snippets from magazines, newspapers, and scrap paper.  Cut out words, tiny pictures numbers or designs, really anything you want.  You can also use paint or stamping to enhance your design.  Remember to decorate both side.  Let glue dry.


8. The next step is glazing the pendant.  Squeeze out a little Ultra-thick (R) on a paper plate . Hold the pendant by the eye pin or with a toothpick, use the stiff 1/4" brush to cover the pendant with the Ultra-Thick(R) glaze.   Cover completely and let it dry at least 30 minutes.  If the weather is very humid, the pendant may need to dry overnight.  Use toothpick and the egg carton to hold the pendant while it is drying.  You need to put two coats of the Ultra-Thick (R) glaze on the pendant.


9.  While pendant is drying, we are going to assemble the beads which hang below the pendant.  String beads on the head pin.  Use the remainder of the headpin to form a loop.  For more detailed instructions on how to make headpin loop, go to this link.  Then using a jump ring attach the headpin to the eye pin on the bottom of the pendant.  If you are not sure about these last directions, go to the links, that will help.

10.  Last step is to put on bail.  Attach bail to the top eye pin.  Now you can wear your pendant on a chain, a ribbon or a leather cord.  And here is your finished pendant.  Enjoy it!!


Try making the pendant, let me know how it goes--send me a picture of your creation.

Don't forget the free annemadethis giveaway.  Read my December 27th blog for entry directions.  Drawing will be on January 25th!

anne

Monday, January 9, 2012

Making Paper Beads

This is what your paper beads will look like
How I make Paper Beads for my Etsy shop: annemadethis

Some how this tutorial got lost, so I am rewriting it and posting it again.

Materials:
Front of the cereal box                        Styrofoam egg carton                      
Scissors                                             Soft brush & square edge brush (1/2")
Ruler                                                  Pencil
Tacky Glue                                          Paper plate
Tooth picks                                         TripleThick Gloss

1. For a basic 3/4" bead, start with the front of a cereal box.  Turn it over to the back side or inside of the box.  Start with the shorter end (A) and mark the edge every 3/4".  On the opposite end (B), measure in 3/8", this is your first mark on the (B) end.  From this mark, measure in 3/4" intervals until the end.  See picture below.

Back of cereal box marked in 3/4" intervals 

2. Using a ruler, connect the first mark on edge (B) with with the corner of the box on edge (A).  Now connect the first mark on edge (A) to the first mark on edge (B).  This will make a long triangle.  It sounds confusing at first, but look at the picture below, you will get it very quickly.

The next triangle is formed by connecting the first mark on edge (A) with the second mark on edge (B), then connecting  second mark on edge (B) with second mark on edge (A).  You will now have formed 3 triangles for bead making.  Continue this way until all marks are connected.  Marking the cardboard is probably the hardest part of this process.

All marks connected to form triangles
3.  Cut along the lines carefully.  You should have about 18 long triangles.  Throw away the first and last pieces, they are scrap.

Triangle cut from cereal box
4. Squeeze a dollop of glue on the paper plate.  Have your soft brush  and a tooth pick nearby.  Take one triangle, starting with the larger end and bend it gently around the tooth pick.  Continue wrapping the triangle tightly around the tooth pick.  Try to keep it straight and centered.  When you are about 2" from the tip of the triangle, apply the tacky glue with the brush on the remaining part of the triangle.  Now continue wrapping until the end.  Hold end firmly until glue sets, usually less than a minute.  Stick the finished bead with the tooth pick into a Styrofoam egg carton or other container.  If you put another tooth pick in the opening, this will steady the bead and set it up for glazing.  Let it dry about 30 minutes.

Beads drying

5.  The last step is glazing the bead.  I like to use a high gloss acrylic glaze, Triple Thick (R) .  Holding the bead by the tooth picks, I coat each bead, using the square edge brush.  It usually takes about 30 minutes for the glaze to dry, then I brush on another coat.  Then I usually let the beads dry overnight.  This makes the hard shiny finish I love.

This is just the first step in making beads.  You can vary the size and thickness of the paper.  Also you can alter the shape of the paper that you wrap, this will change the shape of the bead.

Try making a few beads, let me know if the directions need revision.  Send me your comments and pics of your beads!

You can see the beads I have made at my Etsy shop, please stop by.  Like my Facebook page too!

Tuesday, January 3, 2012

A new year

Greetings and Happy New Year!

Here we go into another brand new year, with no idea what it might hold for us.  It's scary and yet exciting.

Try to find the fun and the beauty in every day, instead of complaining about the changes.  Do something new, look at same thing or the same place in a different light.   Find beauty in something everyday.

If you do what you did last year you will get the same results.  That is not what I am looking for.  What about you?

This year my intention is to accept myself and others, appreciate what is around me while always striving to learn see and do more.

There will always be changes, without them none of us would grow.

Don't forget to write comments for a chance in the annemadethis free givaway!!  See my post on December 27th.

Also check out howaboutorange.blogspot.com  for a great craft idea for snowy days.


Anne