Monday, January 21, 2013

Monday Morning

Happy Birthday Tori!

Greetings to all,

I have to start today with happy birthday wishes to my sweet daughter, Tori.  She has helped me immensely with  annemadethis, so special thanks and love go out to her this weekend!

And here is a new bracelet, Tori designed and I created.  It is three strands of leather closed with a toggle clasp.  Porcelain and paper beads embellish the leather cords.  if you make this bracelet, be sure that all of your beads have holes large enough for the leather cords to pass through.  You can use a combination of  leather, hemp or even a ball chain to add some variety to the bracelet.

Tori's Bracelet

Journals with hand decorated covers is another great use for recycled paper and embellishments.  It makes a great project for groups of all ages and I thought might work well with some of spring workshops.  The journals start with inexpensive hard cover composition books or sketch books.  You can use any size for this project.  Magazine scraps, colored paper, fabric and even fibers are glued to the covers until you get a pleasing design.  Be careful not to get glue on the inside pages.  Stamping, buttons, beads, ribbons, paints and pastels can be used for finishing touches.  Sometimes I even decorate the first page or add a cute bookmark, just for fun!  Then I put a few generous coats of Triple Thick acrylic gloss to protect it all.  I'll be making a few of these journals for my Etsy shop, if you'd like to take a look.  Here are some examples.


So please stop by my shop annemadethis, I'll be adding some new things.  And like my Facebook page!  If you have any questions about this post, or any others please feel free to contact me.

Thanks for checking in,

anne


Monday, January 14, 2013

Pretty Things to Make


Tori wearing my new scarf
Here's a picture of my new scarf.  I knitted it on #50 needles, it took about two hours and one skein of Mo'Puffs yarn by U. Knitted Nation.  Great yarn and great scarf right! Locally the yarn is sold at Flying Fingers Yarn Shop in Tarrytown, NY.  So... this morning I wore my new scarf to the Farmer's Market.  The first comment I got was from a guy who really thought the scarf was an homage to the brussel sprout!  His family loved brussel sprouts, that is what he was buying at the Farmer's Market.  The scarf reminded him of his little cabbages of goodness.  And even though I love brussel sprouts too, really?

Next a woman came up to me and asked if she could take a picture of the scarf for her blog.  Ellen Margulies is a knitter and writes a fiberarts blog.  She will have a picture of me wearing the scarf at the Farmer's Market on her blog.  Hope I look good.


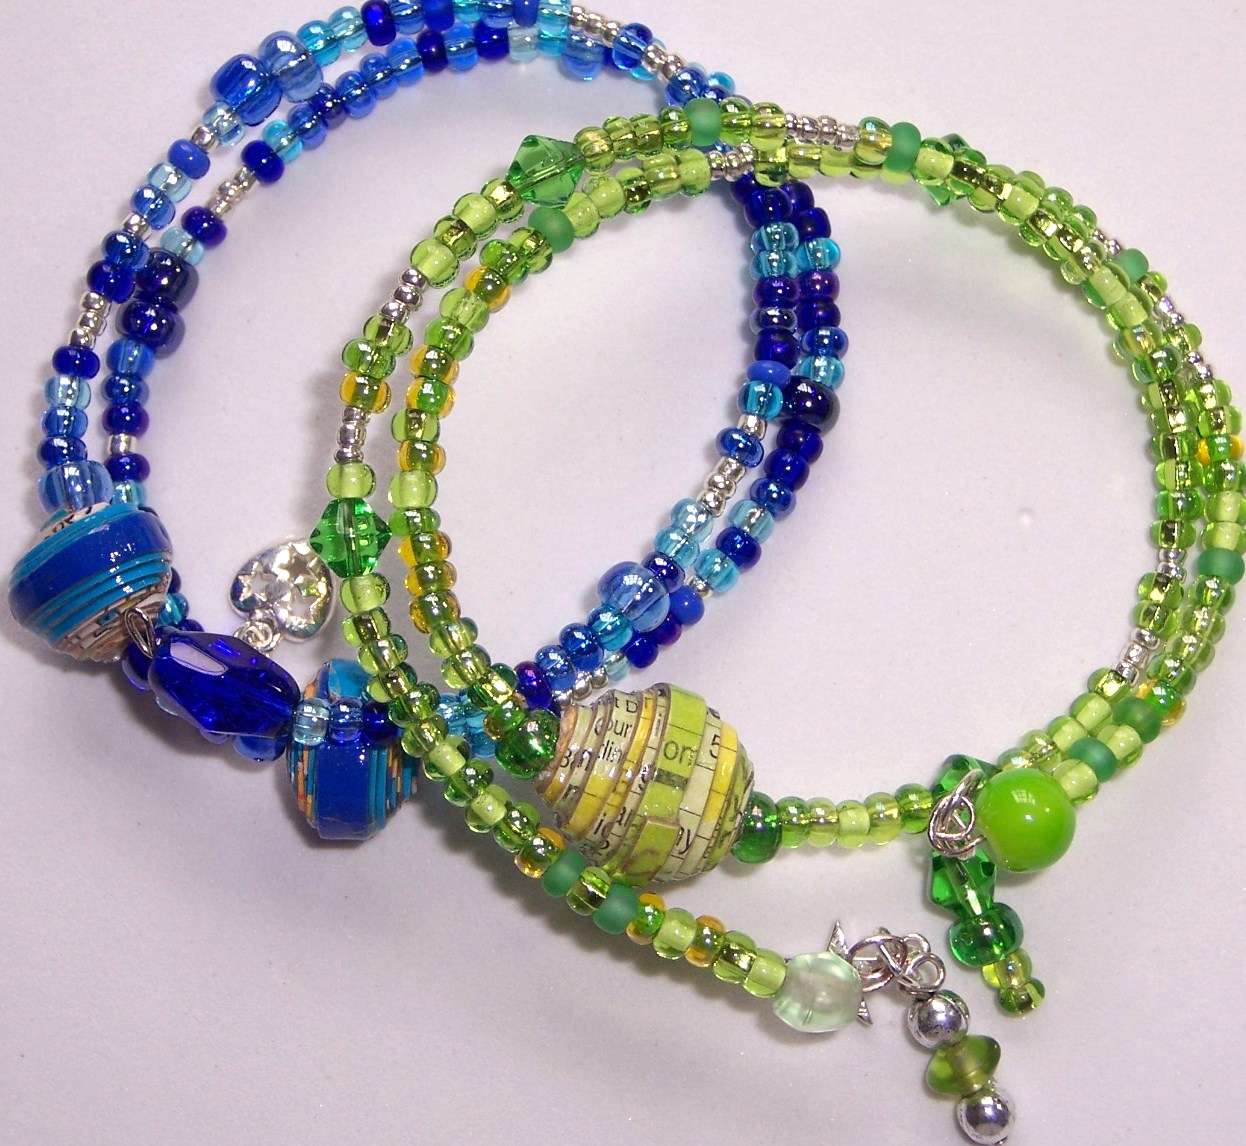
Memory Wire Bracelet

I have a few jewelry workshops planned locally during the school winter vacations.  This project is a memory wire bracelet especially designed for middle school children.  They will make a few paper beads crafted from recycled cereal  boxes.   They will roll, glue and glaze the beads, just like I do.  While the glazed beads are drying, they can choose from various sizes and colors of seed beads to complement their paper beads and design a unique one of a kind piece.  I will help attach charms and other adornments or if the student is familiar with using jump rings and head pins they can complete their own.  You can contact me directly for more information.

I got my first international sale last week!  Yahoo!  Hope to see you soon on my Etsy site.  New Valentine's Day gifts for your sweetheart!! 

Talk to you soon,
anne

Thursday, January 3, 2013

Happy New Year's

New Year's Eve in Times Square
Hi to all,

So glad to be back.  Happy New Year to everyone.  Happy 2013!

On New Year's Day, my family always eats black-eyed peas, it's our traditional dinner.  Its been said, "Eat peas on New year's day to have plenty of everything the rest of the year"

This year when I was shopping for black-eyed peas, a woman in the store told me that her family ate lentils for good luck in the New Year,  I got curious about the history of New Year's celebrations and other New Year's traditions.

New Year's Day is the oldest holiday, it has been celebrated since 4000 BC by the ancient Babylonians.  They celebrated New Year's on the first day of spring, the festivities last eleven days.  The Babylonians started the custom of making New Year's resolutions.

Around 150 BC, the Romans set January 1 as New Year's Day.  They probably originated the tradition of "toasting".  The host would always drink first.  Because the wine was not as refined as it is today, the Romans would float a piece of toast in the wine bowl to absorb the excess acidity and make the wine more palatable.

The early Catholic church condemned New Year's celebration through the Middle Ages.  Though, some denominations celebrated the Feast of Christ's Circumcision on New Year's Day, ugh!  But once a baby was used as the symbol of the New Year, the Church allowed its members to celebrate with a baby that symbolized baby Jesus.  New Year's Day is still a Holy Day of Obligation for Catholics.

Today, New Year's is celebrated with football, parades, fireworks, polar bear plunges and resolutions.   Many believe that the traditional New Year's foods will bring us good luck for the coming year.  The Dutch eat donuts, a ring symbolizing the beginning and the end.  In Spain, you eat 12 grapes at the stroke of midnight for twelve good months.  In Greece they bake a coin in a St. Basil's cake, who ever finds the coin in his piece will have good luck all year.  The hog and its meat symbolize prosperity and is frequently eaten on New Year's Day, often with the black-eyed peas.  And cabbage is the good luck vegetable, it symbolizes paper currency and in some cultures rice is the food to eat.  It just worked out that I had lentil soup and black eyed peas this New Years, hopefully that will give me a double helping of good luck!

Well that's it for today.  Please stop by my shop annemadethis on Etsy, I'd love to have you drop by.  Feel free to contact me with any questions.  And maybe start the new year off crafting-check out the tutorials on my earlier blogs.

Ta ta for now,
anne


Friday, December 21, 2012

Holiday Craft Fair

Tori at Tarrytown Holiday Crafts Show

Hi to all.

Sorry it's been so long.  There hasn't been a lot to write about lately.  I have been winding down the holiday craft fairs and immersing myself in my own holiday plans.  The holiday craft fairs did not lived up to my expectations.  But disappointments are not always what they seem.

Albert Einstein failed his college entrance exam. Walt Disney was fired from his first media job. Michael Jordan was cut from his high school basketball team. Get it?  So I will continue on! 

Scarf I bought from Nine Muses of Crete
SOME INSPIRATIONS FROM ETSY ARTIST FOR 2012
Decoupage Bowl


Fantasy Children's sweater


These are a few of the items I found on Etsy from some of my favorite artists--there are now 800,000 shops on Etsy, incredible isn't it?  I have been writing this blog for a little over a year now,  The writing is easy compared with the daily battles with HTML!!  Thank you all for reading my blog and sticking with me.  I hope everyone has a happy holiday and a great 2013!!

I will see you next year!

anne

Tuesday, November 27, 2012

Thanksgiving Craft Party


Kaye Lynn, Amelia and me
Emily and Amelia


Hi to all,


In our family we have a long standing tradition of doing crafts at Thanksgiving.  Here we are working on holiday cards and wire bracelets; all crafted using recycled paper.   We used paper beads for the wire bracelets and tube beads for the cards.  You can check back to my September posts for a tutorial.  Here are some examples of what we made:


These handmade items would make great gifts for the holiday season.  You will see these and many more at the Holiday Craft Show in Tarrytown on December 1st.  It will be at the Reformed Church on N. Broadway from 11am until 5pm.  There will be refreshments and lots of local artisans there with great one of a kind gifts.  The show is put on by the Hudson Valley Crafts Collective.  It would be great to see you there.  Bring this blog and get 20% off your purchase at my table!


I will also have lots of glitzy glamorous jewelry for your holiday fashions.  Be sure to come see it.  All of the jewelry fashions are available on my Etsy site annemadethis, so please take a look.


Have a great week, check out my Etsy site and I will talk to you later!

anne

Thursday, November 8, 2012

"Literary" Paper Pendant Tutorial

Jane Eyre Necklace
Alice in Wonderland Bracelet
Alice in Wonderland Pendant
Hi to all,

If you have been keeping up with my blog, I know you have seen my "literary" jewelry pieces.  The were made from the pages of old or reproductions "classics".  Below is a basic tutorial to make one of these pieces for yourself from your favorite novels!

MATERIALS:
small piece of corrugated cardboard 
eye pins not more than 1" (I prefer to use silver plated findings, they 
always look nice and shiny)*
1.5-2" head pins*
5mm-6mm & 8mm jump rings*
1-bail*
a few small/medium beads to add to your necklace orbracelet (optional)
old style classic book, one with illustrations or decorated text
Tacky glue
Triple thick(R) gloss glaze
toothpicks
styrofoam egg carton
paper plate
Black paint
Black magic marker
silver chain, suede cord or rubber cord

TOOLS: scissors, jewelry pliers and wire cutters, 1/4" soft and 1/4" stiff brush, hot glue gun skewer and awl

STEPS:
1. Take corrugated cardboard and cut into two ovals or circles about the size of a quarter or a little larger.  This will be the "focal bead" of your necklace.  I used ovals and circles in my pieces, but really any shape is fine.  You may want to add smaller "beads" to your necklace, cut those out now too.  The smaller beads on the Alice in Wonderland bracelet and the Jane Eyre necklace were crafted from one disk of corrugated cardboard.  This will probably work with your design also.  I used quarters for the larger beads and nickels as templates for my smaller beads.


2. For the focal bead, or the largest bead; line up the 2 eye pins in the center of the piece.  Now using a hot glue gun, set the two pins in position.


3. Using the hot glue gun again, glue the two pieces together (like a sandwich), with the eye pins on the inside.  Make sure both eye pins stick out and the pieces are lined up evenly. 


4. Paint using thick black paint all around the edges of the piece.  This gives a more finished look to your focal bead.  You can also paint around the smaller pieces or even use a black magic marker to finish off those edges.  
    
5. Set the smaller "beads" aside.  Now you can decorate your "focal bead" with pieces of the text or  illustrations from your "classical" text.  Cut out words, illustrations or designs, really anything you want.    Glue to focal bead with tacky glue using the soft brush.  Remember to decorate both sides.  Try to use words and images representative of the book.  Let glue dry.


6.  Using the same basic techniques, decorate the smaller disks or beads.  Before gluing words or images, poke a small hole about 1/8" from the circumference of the disk.  We will use this hole later for attaching a jump ring.  Now decorate your disks as you did your "focal bead".  Once glue is dry, re-poke hole with awl, then pierce again with a toothpick.  This should enlarge hole.

7. The next step is glazing all of the beads.  Squeeze out a little Ultra-thick (R) on a paper plate . Hold the pendant by the eye pin or with a toothpick, use the stiff 1/4" brush to cover the pendant with the Ultra-Thick(R) glaze.   Cover completely and let it dry at least 30 minutes.  If the weather is very humid, the pendant may need to dry overnight.  Use toothpick and the egg carton to hold the pendant while it is drying.  You need to put at least two coats of the Ultra-Thick (R) glaze on the pendant.


8.  While pendant is drying, we can assemble the beads which hang below the "focal bead" (from the eye pin).  String beads on the head pin.  Use the remainder of the headpin to form a loop.  For more detailed instructions on how to make headpin loop, go to this link.  Then using a jump ring attach the headpin to the eye pin on the bottom of the pendant.  If you are not sure about these last directions, go to the links, that will help. 


9.  Last step is to put on bail or a jump ring.  If you plan to wear your pendant bead alone on a rubber or leather cord, attach bail to the top eye pin.  Then slide it on the cord.  If you are wearing pendant bead as a necklace or bracelet with the other disks on a chain, attach a jump ring to the disks and they will easily attach to a chain. Have fun with it and enjoy!!  I'd love to see your creations.


Be sure to check my Etsy shop for new glitzy holiday pieces!

Talk to you soon.

anne

Tuesday, October 30, 2012

Happy Halloween


HAPPY HALLOWEEN

Hi to all,

My heart felt wishes and prayers go out to all of you who have suffered through Hurricane Sandy.  I hope that all things will return to normal as soon as possible.  

What about Halloween?  I wanted to find out more about it, so I did a little research.  All of our Halloween customs have roots in ancient and medieval Europe.  Many historians believe that Halloween originated as a harvest festival. As the days got shorter and the nights got colder, people all over the world ushered in winter with gatherings, bonfires, costumes and sweets.  One of the oldest of these festivals was an ancient Celtic festival called "Sanhain".  The participants celebrated the harvest by lighting bonfires and wearing costumes to scare off the ghosts of the dead.  Sound familiar?

Later, about 800 A.D., All Saint's Day was declared a religious festival celebrated on November 1.  All Saint's Day was a celebration and remembrance of the dead.  The name Halloween probably was derived from "All Hallows Eve", the eve before All Saint's Day. The night before All Saint's Day, poor children would roam the neighborhood begging for "soul cakes"; this is believed to be the origination of "trick or treating".    "Trick or treating" was not really a common custom until the 1930's in America.  Amazing!

The eve of All Saint's Day was a spirit's last chance to avenge any living enemies before moving to the next world.  Costumes were worn as disguises, so these spirits could not find you.   Turnips and pumpkins were used as lanterns, the beginnings of our modern jack o'lantern.  Apples were a harvest symbol back to Roman times, now we bob for apples and eat candy apples.  And finally, the candy corn was made to represent a kernel of corn, another harvest symbol.  So there you have it, some of the ancient roots of Halloween.  Have a great scary night!

Kaye Lynn, Max and Tori, my best supporters!

Saturday was the Croton Artisan fair.  Here's my team!  We had fun, there were a lot of ghosts and goblins trick or treating from one vendor to another.  And thankfully the weather held.  Below are a few new things I added to my table at the last minute.  A little holiday glitz and some necklaces made with paper beads, old acrylic beads and ribbon.


And finally, please take a look at my Make your own holiday cards and gift tags with Recycled Paper Workshop.  It will be fun for all ages!  It is being held on November 3 at the Greenburgh Nature Center.  You can see what we will be doing in my blog of September 18th.  I'd love to see you there.

Well that's all for now.  Check out my Etsy site and thanks for visiting my blog.
Talk to you soon,

anne